There are lots of posts out there about launching a podcast. But for some reason when we were launching our new podcast Agency Highway, I couldn’t find anything that covered everything from top to bottom, that wasn’t outdated.
The most important thing to me is that I want the process of recording, editing and uploading to be as fast as possible and require as little work as possible.
I think I’ve found the tools that achieve that.
This guide doesn’t go into all the details of each step, as once you’re inside the various tools, you’ll be able to work them out.
Before we do anything
You’ll need a decent microphone. I use the Rode NT USB. Many podcasters use the Audio Technica ATR2100. Make sure you get the USB version. Having it on a boom is nice as it stops vibrations coming through your desk. I use the Rode PSA 1 Boom.
Your podcast info
Every guide seemed to say something to the effect of “choose what your podcast is about!”.
I’m guessing you’ve got that covered. There’s not really much point launching if you don’t.
One thing I would add is to decide what kinds of episodes you will have. Interviews? Short reviews?
Whatever they are, you can mention them in the intro audio so that people know what to expect. More on this below.
The main things to get ready here are:
- Name
Don’t include ‘podcast’ in the title. Apparently this make it less likely to be syndicated in some places.
Ours: Agency Highway
- Description
Who the podcast is aimed at and what it will do for people.
Ours:
Agency Highway is a podcast for digital agencies who want to grow, earn more and work less.
Episodes are a mix of quick wins, interviews with people who are doing amazing things, tools, tips and resources that will help you grow your agency and build the life that you want.
- Logo and cover art
Get it done at 3000×3000 pixels
Ours:

Audio files and tools
- Theme/intro music
Lots of people get their composer friends to make one.
I just listened to a bunch on AudioJungle and found one that I liked, and I thought would work with me speaking over the top.
- Record Intro and outro
Type up what you want to say in your intro and outro.
In the intro, introduce the show, who it is for and what kind of episodes you’ll have. For Agency Highway I just read the description from step 2 above.
The outro says to visit the website for show notes and transcriptions, and asked to share/review.
Then record you speaking them.
On Windows use Audacity. On Mac use Garageband.
Get close to the mic and speak clearly. It might take a few goes to get it right.
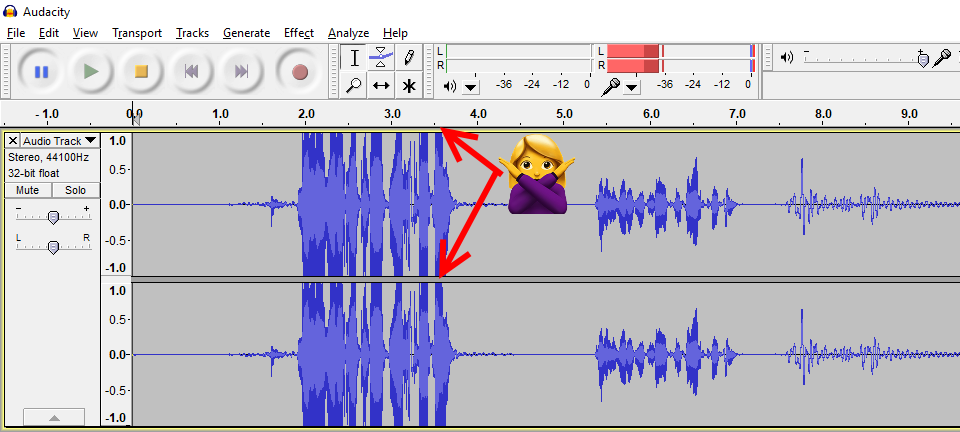
Also watch for ‘clipping’ in your audio editor. If your microphone gain is up too high, the waveform will touch the top and bottom. This is bad. Change your microphone volume so that this doesn’t happen. It should look something like the audio on the right of the emoji.
- Edit Intro and Outro
Add the music you picked. This requires a little audio editing and might be something you want to outsource. It’s not all that hard though.
For Agency Highway, I used the Audacity “Envelope Tool” to fade out the music before I started talking. That looks like the image below. You can see the audio dropping out (bottom track) as my speech starts (top track).

Save these as MP3s.
I kept a few seconds of music after I finished speaking in the intro, and before I start speaking in the outro. These used the “fade out” effect on Audacity.
Outlines & questions
- Create sections and questions document
Create a document where you have all the info you need for each episode. Things like:
- Dot points you want to say at the beginning of episodes
- Notes for introducing guests
- Questions to ask guests if you get stuck
- Dot points you want to say at the end of the show (like asking the guest where people can find out more about them)
This is helpful to refer to during recordings so you don’t get stuck.
Guest booking
If you’re not doing the guest thing, ignore this part.
- Create a guest info form
Create a form that collects everything you need from guests. That might be their bio, photo, logo, links & social profiles. Whatever you need to do the interview.
There are loads of tools for this like: Gravity Forms (WordPress), Typeform, Google Forms.
- Booking system
Choose a system that allows guests to book in time slots. I use Book Like a Boss because I got a lifetime deal for it. Calendly is also great.
You can use most booking systems to send automatic reminders so you and your guest don’t forget. Also make sure you set up Google Calendar integration so that the event appears on your schedule.
Things to set up in your booking system:
- The “podcast interview” booking option
- On the thank you page, add any info that is relevant
- If you have a document that outlines questions or what to expect, include that
- Ask them to fill out the guest info form before the show and link them to it
- How to connect to the interview at the time
- Info that they’ll need a good microphone and a quiet area
- An immediate follow up email with the same info as the thank you page
- A reminder 2-3 days before the interview with the same info
- A reminder 2-3 hours before the interview with the same info
- Follow up and launch emails
Create an email template that you can send to guests immediately after their interview thanking them, and letting them know what the process is when you go live with their interview.
Create another one for when it goes live so they can check it out and share it (but don’t expect a share).
Recording
- Decide on recording software
If you’re doing solo shows, use Audacity or Garageband.
For interviews, I settled on Zoom. Zoom is nice because you can do it on video, and it exports the audio separately. I prefer to see someone in video as it makes conversations feel more natural.
I also ask guests to record voice on their side just in case quality suffers because of a poor connection. They can use GarageBand (Mac) or Voice Recorder (Windows).
Another option for recording is Zencastr. I hear a lot of great things about this.
Editing
- Decide on or set up editing process
This is my favourite part. Many people outsource this. But the system below is ridiculously easy and costs nothing for up to 2 hours of audio per month.
Check out the tool Auphonic.
You can create a “preset” in Auphonic (see my example below) that:
- Automatically adds your intro and outro**
- Runs several sound quality enhancements to make your episodes sound great
- Exports your file to Dropbox or Google Drive
** You can upload your intro and outro files and specify an overlap with your main interview audio. This is when the music fades out and the interview starts.

Once you have set up a preset, the entire audio editing process becomes:
- Use Audacity/Garageband to cut the main interview out (you will normally talk to the guest before and after, and you don’t want those parts in the final audio)
- Export as an mp3
- Create an Auphonic production using the preset above
- Change the Title, Track number and URL
- Click go
That’s it. Auphonic does the rest and the mp3 appears in your Dropbox.
Website and hosting
- Choose podcast hosting
There’s a lot of info out there about this. They all work in slightly different ways.
There are a few main things you need, generally speaking.
- A podcast feed. This is a special URL that you submit to iTunes etc. Some podcasts hosts create this URL for you. Some require your website to create it.
- Download statistics
- Hosted somewhere else (not your website)
From talking with a lot of people, I decided the feed should come from our website. This has to do with search traffic coming to your site, not the podcast host.
The downside with this method is if something goes wrong with your website, the feed will break. If you choose this method, make sure your site is kept well maintained.
The host I chose is Castos.
That’s because the process with their plugin (below) is very efficient. It is a one step process, which is not the case with many hosts.
All you have to do is create the podcast episode in WordPress.
- Set up your website
I’ll assume you have an existing WordPress website.
Install and setup the Seriously Simple Podcasting plugin. It integrates directly with Castos.
When the time comes to publish, all you need to do is:
- Click Add New Podcast
- Start the upload of the finished Auphonic file
- Add the title and show notes into the WordPress post editor
- Click publish
Castos have many tutorials available for this.
First few episodes
- Record your first few episodes
Many people create an intro episode which is simply an introduction, and tells people can expect from your podcast.
It’s also a good way to get used to the editing and upload process, and gives you something to submit to iTunes etc.
I also recorded 5 others from video interviews I had done previously.
- Upload them to your site
Decide how many you want to launch with, and set them all up on your site.
Launch!
- Submit to podcast directories
This is the exciting bit!
You’ll just need your feed URL which you can get in Seriously Simple Podcasting settings.
Submit to:
- iTunes
- Google Play
- Stitcher
- Spotify
- Promote
Once you start getting approved by these directories, give it a few hours for you to start appearing in search results.
Then send it out to your Facebook, LinkedIn, email list, whatever to get your first downloads. Ask for ratings and reviews.
I wouldn’t worry too much about getting into “New and Noteworthy”.
And you’re done
That was fun, right?
As a recap, this is now the entire process from start to finish every time you record a new episode:
- Ask guest to book through your system (they receive automated emails)
- Do research on guest if required to create questions
- Record
- Trim the recording to the interview
- Upload to Auphonic, add title and track number
- Create new episode in WordPress with Title, Show Notes and the audio file
- Email your guest
How freaking simple is that?
Other notes
- Rev.com is epic for transcriptions. It’s not a cheap as the “software” options, but holy shit it is accurate
- When the time comes to monetize, check out Joe Casabona’s guide on monetizing your podcast
The full list
- Name
- Description
- Logo and cover art
- Theme/intro music
- Record Intro and outro
- Edit Intro and Outro
- Create sections and questions document
- Create a guest info form
- Booking system
- Follow up and launch emails
- Decide on recording software
- Decide on or set up editing process
- Choose podcast hosting
- Set up your website
- Record your first few episodes
- Upload them to your site
- Submit to podcast directories
